
Internal Temperature vs The Bend Test for Barbecue Ribs - Judging Doneness With Accuracy
Achieving the perfect “fall-off-the-bone” texture often leaves pitmasters guessing, caught between the subjectivity of the “bend test” and raw internal temperature readings. While thermometers offer clinical data, visual cues remain the industry standard for assessing texture. Mastering the synergy between these two indicators elevates your craft, ensuring consistent results. Recognize that meat composition varies, making these metrics helpful guidelines rather than absolute laws. Award-winning pitmasters utilize this dual-pronged approach for reliable quality. We now explore integrating these methods for culinary precision.
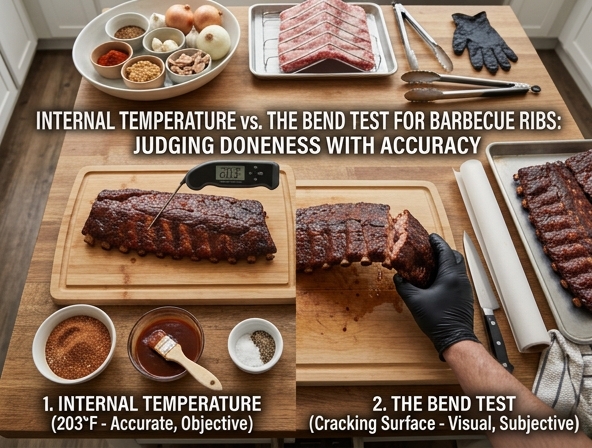
| Method | Description | Primary Benefit |
|---|---|---|
| Internal Temperature | Objective data collected via a meat thermometer. | Provides clinical accuracy for assessing doneness. |
| The Bend Test | Visual and tactile inspection of the rib rack. | Industry standard for judging "fall-off-the-bone" texture. |
| Synergy | The combined use of both clinical data and visual cues. | Ensures consistency and elevated quality in barbecue. |
| Critical Note | Recognition that meat composition is variable. | Treats these metrics as flexible guidelines rather than absolute laws. |
Internal Temperature vs. The Bend Test for Barbecue Ribs: Judging Doneness with Accuracy
For the aspiring pitmaster, few challenges are as iconic-or as fraught with anxiety-as smoking a perfect rack of ribs. Whether you are dealing with St. Louis-cut pork ribs or delicate baby backs, the goal remains the same: achieving that elusive "bite-through" texture where the meat pulls cleanly away from the bone without turning into a mushy, overcooked mess. But how do you actually know when they are done? The BBQ community is perpetually divided between two schools of thought: the traditionalist's "Bend Test" and the precision-focused "Internal Temperature" approach. Understanding both is the key to consistency.
The Science of Collagen: Why Ribs Are Different
To understand why judging rib doneness is difficult, we must first look at the biology of the meat. Ribs are rich in connective tissue, specifically collagen. Unlike the muscle fibers in a steak, which you want to cook to a specific temperature to prevent drying out, collagen requires time and heat to break down into gelatin. This process, known as rendering, is what creates that velvety, succulent mouthfeel that defines great BBQ. Because the meat is intertwined with bone and cartilage, heat distribution is never uniform. This is why a single, reliable metric for doneness is often harder to pinpoint than it is for a simple brisket or a pork shoulder.
The Bend Test: The Old School Standard
The "Bend Test" is perhaps the most romanticized method in BBQ lore. It involves taking a pair of tongs, grabbing the rack of ribs at one end, and lifting it slightly. If the ribs are done, the weight of the meat will cause the rack to arch significantly, and the surface of the meat will crack or "fissure."
Why It Works
The bend test is a physical proxy for collagen breakdown. When the connective tissues have successfully rendered into gelatin, the structural integrity of the meat decreases, allowing it to yield under gravity. It is a visual and tactile confirmation that the meat has reached the desired level of tenderness.
The Pitfalls
The problem with the bend test is its subjectivity. What one pitmaster considers a "perfect crack" another might call "overcooked mush." Furthermore, the bend test is difficult to perform on smaller racks or if the membrane hasn't been properly removed. Additionally, if you wait until the rack bends to a 90-degree angle, you may have already crossed the threshold into overcooked territory, where the meat becomes mushy and loses its structural integrity.
The Internal Temperature: The Scientific Approach
Using a digital instant-read thermometer is the hallmark of the modern pitmaster. By probing the meat between the bones, you can get a numerical value that represents the thermal state of the collagen breakdown.
Finding the "Sweet Spot"
Most pitmasters look for an internal temperature between 195°F and 205°F. However, it is vital to remember that temperature is a guide, not a binary switch. Because ribs are bone-in, inserting a probe can be tricky. If your probe touches the bone, you will get a false high reading. You must navigate the probe into the center of the thickest part of the meat between the ribs to get an accurate measurement.
The Limitation of the Probe
The primary critique of using temperature for ribs is that it ignores texture. Because ribs vary in thickness, fat content, and age of the animal, two racks might reach 200°F at different times, but one might have perfectly rendered fat while the other remains slightly chewy. Temperature confirms that the meat is hot enough to have broken down collagen, but it cannot tell you if the meat is *actually* tender.
The Synergy: Combining Both Methods
The secret to championship-level ribs lies in using both methods in tandem. Do not view them as competing philosophies; view them as different data points in your quest for perfection.
- The Baseline: Use your thermometer as you approach the 5-hour mark. Once you see the internal temperature hitting the 190°F range, start paying closer attention.
- The Sensory Check: Once the temperature is in the 195°F–200°F window, perform a gentle bend test. The rack should flex, but it should not look like it is about to snap in half or fall apart entirely.
- The Pull-Back: Look for the "pull-back" on the bones. You want to see about 1/4 to 1/2 inch of bone exposed. If the meat has pulled back too far, you are likely already overcooked.
- The Toothpick Test: A final, often overlooked trick is the toothpick test. If you can slide a wooden toothpick into the meat between the ribs with zero resistance-similar to sliding it into a stick of butter-you have achieved the perfect state of tenderness.
Practical Tips for Consistent Ribs
Even with the best tools, environmental factors play a massive role. The "stall"-the point where evaporative cooling keeps the meat temperature steady-can last for an hour or more. If you are wrapping your ribs (the "Texas Crutch"), realize that the temperature will rise significantly faster once wrapped, increasing the risk of overcooking.
Furthermore, always account for carry-over cooking. A rack of ribs pulled off the smoker at 200°F will continue to rise in temperature as it rests. Resting your ribs for 15 to 20 minutes is not optional; it allows the juices to redistribute and the meat fibers to relax, which is the final step in achieving that perfect bite.
Conclusion: Trusting Your Pitmaster Instincts
The debate between the Bend Test and Internal Temperature is ultimately a false dichotomy. The thermometer provides the objective safety net that prevents you from serving raw or under-rendered meat, while the bend test and the toothpick test provide the subjective assurance that the texture is exactly where you want it. By mastering the thermometer to gauge heat and the bend test to gauge texture, you elevate your BBQ from a guessing game to a consistent craft. Practice, take notes on your cook times and temperatures, and eventually, you won't need to look for a number or a crack-you'll simply know by feel.
Disclaimer:
The information provided on Eateryn is for general educational and informational purposes only and is not intended as medical, nutritional, or healthcare advice. It should not be used to diagnose, treat, cure, or prevent any disease or medical condition.
Always consult a qualified physician, registered dietitian, or other certified healthcare professional before making changes to your diet, exercise routine, or lifestyle, or regarding any medical questions or concerns you may have. Never disregard or delay seeking professional medical advice because of something you have read on this website.